用于互动学习的私人聊天机器人
| 时间:120 分钟 | 难度:高级 |
|---|
通过聊天机器人,公司可以扩展其培训计划,以适应庞大的员工队伍,在不同部门、地点和时区提供一致且标准化的学习体验。此外,在完成在线培训后,公司员工可能希望回顾旧的课程材料。这些信息大部分属于公司专有,手动搜索整个资料库既耗时又费力。然而,一个基于这些知识构建的聊天机器人可以在眨眼间做出回应。
通过简单的 RAG 管道,您可以构建一个私有聊天机器人。在本教程中,您将在一个封闭的基础设施中结合开源工具,并通过一个可靠的框架将它们连接起来。这个自定义解决方案允许您在没有公共互联网访问的情况下运行聊天机器人。您将能够保护敏感数据,而不会损害隐私。
 图 1: LLM 和 Qdrant 混合云被容器化为独立服务。Haystack 将它们组合成 RAG 管道,并通过 Hayhooks 暴露 API。
组件
为了保持完整的数据隔离,我们需要将自己限制在开源工具范围内,并在私有环境中使用它们,例如 Red Hat OpenShift。管道将内部运行,无法从互联网访问。
- 数据集: Red Hat 交互式学习门户,一个 Red Hat 课程材料的在线图书馆。
- LLM:
mistralai/Mistral-7B-Instruct-v0.1,作为独立服务部署在 OpenShift 上。 - 嵌入模型:
BAAI/bge-base-en-v1.5,轻量级嵌入模型,通过 FastEmbed 从 Haystack 管道内部部署。 - 向量数据库: Qdrant 混合云,运行在 OpenShift 上。
- 框架: Haystack 2.x 用于连接所有组件,Hayhooks 用于通过 HTTP 端点提供应用程序服务。
步骤
Haystack 框架利用两个管道,它们按顺序组合我们的组件来处理数据。
- 索引管道将在添加或更新新数据时以批处理方式离线运行。
- 搜索管道将从 Qdrant 检索信息并使用 LLM 生成答案。
注意: 我们将以 Python 定义管道,然后将其导出为 YAML 格式,以便 Hayhooks 可以将它们作为 Web 服务运行。
先决条件
将 LLM 部署到 OpenShift
请遵循 第 6 章 “服务大型语言模型” 中的步骤。这将从 HuggingFace 下载 LLM,并使用单一模型服务平台将其部署到 OpenShift。
您的 LLM 服务将有一个 URL,您需要将其存储为环境变量。
export INFERENCE_ENDPOINT_URL="http://mistral-service.default.svc.cluster.local"
import os

os.environ["INFERENCE_ENDPOINT_URL"] = "http://mistral-service.default.svc.cluster.local"
启动 Qdrant 混合云
完成如何在 Red Hat OpenShift 上设置 Qdrant。在混合云中,您的 Qdrant 实例是私有的,其节点运行在与您的其他组件相同的 OpenShift 基础设施上。
检索您的 Qdrant URL 和 API 密钥,并将它们存储为环境变量
export QDRANT_URL="https://qdrant.example.com"
export QDRANT_API_KEY="your-api-key"
os.environ["QDRANT_URL"] = "https://qdrant.example.com"
os.environ["QDRANT_API_KEY"] = "your-api-key"
实施
我们首先将创建一个索引管道以向系统添加文档。然后,搜索管道将从我们的文档中检索相关数据。在测试管道之后,我们将它们导出到 YAML 文件。
索引管道
Haystack 2.x 附带了许多有用的组件,从数据获取到 HTML 解析,再到向量存储。在我们开始之前,我们需要安装一些 Python 包。
pip install haystack-ai \
    qdrant-client \
    qdrant-haystack \
    fastembed-haystack
我们的环境现在已准备就绪,我们可以直接开始编写代码。让我们定义一个空的管道并逐步向其中添加组件。
from haystack import Pipeline

indexing_pipeline = Pipeline()
数据获取与转换
在此步骤中,我们将使用 Haystack 的 LinkContentFetcher 从 URL 列表下载课程内容并将其存储在 Qdrant 中以供检索。由于我们不想存储原始 HTML,因此此工具将从每个网页中提取文本内容。然后,抓取器将它们分成可消化的块,因为文档可能很长。
让我们从数据获取和文本转换开始
from haystack.components.fetchers import LinkContentFetcher
from haystack.components.converters import HTMLToDocument

fetcher = LinkContentFetcher()
converter = HTMLToDocument()

indexing_pipeline.add_component("fetcher", fetcher)
indexing_pipeline.add_component("converter", converter)
我们的管道知道有两个组件,但它们尚未连接。我们需要定义它们之间的流向
indexing_pipeline.connect("fetcher.streams", "converter.sources")
每个组件都有一组输入和输出,它们可以组合成一个有向图。输入和输出的定义通常在组件的文档中提供。LinkContentFetcher 具有以下参数
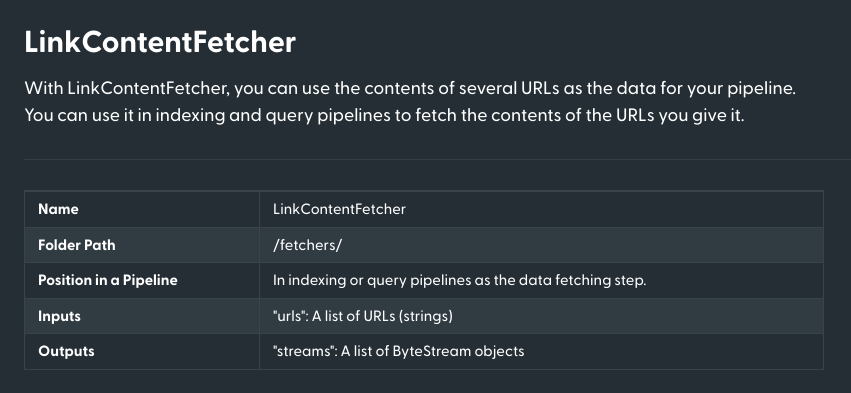
来源:https://docs.haystack.com.cn/docs/linkcontentfetcher
分块和创建嵌入
我们使用 HTMLToDocument 将 HTML 源转换为 Haystack 的 Document 实例,这是一个包含一些要查询的数据的基类。但是,单个文档可能太长而无法由嵌入模型处理,而且它还包含太多信息,使得搜索不相关。
因此,我们需要将文档拆分成更小的部分并将其转换为嵌入。为此,我们将使用 DocumentSplitter 和指向我们的 BAAI/bge-base-en-v1.5 模型的 FastembedDocumentEmbedder
from haystack.components.preprocessors import DocumentSplitter
from haystack_integrations.components.embedders.fastembed import FastembedDocumentEmbedder

splitter = DocumentSplitter(split_by="sentence", split_length=5, split_overlap=2)
embedder = FastembedDocumentEmbedder(model="BAAI/bge-base-en-v1.5")
embedder.warm_up()

indexing_pipeline.add_component("splitter", splitter)
indexing_pipeline.add_component("embedder", embedder)

indexing_pipeline.connect("converter.documents", "splitter.documents")
indexing_pipeline.connect("splitter.documents", "embedder.documents")
将数据写入 Qdrant
拆分器将生成最大长度为 5 个句子,重叠 2 个句子的块。然后,这些较小的部分将转换为嵌入。
最后,我们需要将我们的嵌入存储在 Qdrant 中。
from haystack.utils import Secret
from haystack_integrations.document_stores.qdrant import QdrantDocumentStore
from haystack.components.writers import DocumentWriter

document_store = QdrantDocumentStore(
    os.environ["QDRANT_URL"],
    api_key=Secret.from_env_var("QDRANT_API_KEY"),
    index="red-hat-learning",
    return_embedding=True,
    embedding_dim=768,
)
writer = DocumentWriter(document_store=document_store)

indexing_pipeline.add_component("writer", writer)

indexing_pipeline.connect("embedder.documents", "writer.documents")
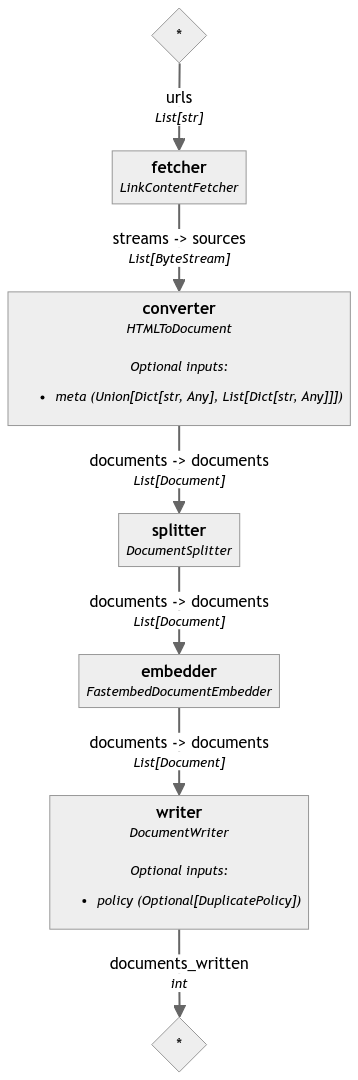
我们的管道现在已经完成。Haystack 附带了一个方便的管道可视化工具,因此您可以查看和验证组件之间的连接。它显示在 Jupyter Notebook 中,但您也可以将其导出到文件
indexing_pipeline.draw("indexing_pipeline.png")
测试整个管道
我们终于可以在一系列 URL 上运行它,以将内容索引到 Qdrant 中。我们有许多 Red Hat OpenShift Foundations 课程的所有课程的 URL,所以让我们使用它们
course_urls = [
    "https://developers.redhat.com/learn/openshift/foundations-openshift",
    "https://developers.redhat.com/learning/learn:openshift:foundations-openshift/resource/resources:openshift-and-developer-sandbox",
    "https://developers.redhat.com/learning/learn:openshift:foundations-openshift/resource/resources:overview-web-console",
    "https://developers.redhat.com/learning/learn:openshift:foundations-openshift/resource/resources:use-terminal-window-within-red-hat-openshift-web-console",
    "https://developers.redhat.com/learning/learn:openshift:foundations-openshift/resource/resources:install-application-source-code-github-repository-using-openshift-web-console",
    "https://developers.redhat.com/learning/learn:openshift:foundations-openshift/resource/resources:install-application-linux-container-image-repository-using-openshift-web-console",
    "https://developers.redhat.com/learning/learn:openshift:foundations-openshift/resource/resources:install-application-linux-container-image-using-oc-cli-tool",
    "https://developers.redhat.com/learning/learn:openshift:foundations-openshift/resource/resources:install-application-source-code-using-oc-cli-tool",
    "https://developers.redhat.com/learning/learn:openshift:foundations-openshift/resource/resources:scale-applications-using-openshift-web-console",
    "https://developers.redhat.com/learning/learn:openshift:foundations-openshift/resource/resources:scale-applications-using-oc-cli-tool",
    "https://developers.redhat.com/learning/learn:openshift:foundations-openshift/resource/resources:work-databases-openshift-using-oc-cli-tool",
    "https://developers.redhat.com/learning/learn:openshift:foundations-openshift/resource/resources:work-databases-openshift-web-console",
    "https://developers.redhat.com/learning/learn:openshift:foundations-openshift/resource/resources:view-performance-information-using-openshift-web-console",
]

indexing_pipeline.run(data={
    "fetcher": {
        "urls": course_urls,
    }
})
执行可能需要一段时间,因为模型需要处理所有文档。过程完成后,我们应该已将所有文档存储在 Qdrant 中,准备好进行搜索。您应该会看到已处理文档的简短摘要
{'writer': {'documents_written': 381}}
搜索管道
我们的文档现在已经索引并准备好进行搜索。下一个管道稍微简单一些,但我们仍然需要定义一些组件。让我们再次从一个空管道开始。
search_pipeline = Pipeline()
我们的第二个流程接收用户输入,将其转换为嵌入,然后使用查询嵌入搜索最相关的文档。这可能看起来很熟悉,但我们不再使用 Document 实例,因为查询只接受原始文本。因此,某些组件会有所不同,特别是嵌入器,因为它必须接受单个字符串作为输入并生成单个嵌入作为输出。
from haystack_integrations.components.embedders.fastembed import FastembedTextEmbedder
from haystack_integrations.components.retrievers.qdrant import QdrantEmbeddingRetriever

query_embedder = FastembedTextEmbedder(model="BAAI/bge-base-en-v1.5")
query_embedder.warm_up()

retriever = QdrantEmbeddingRetriever(
    document_store=document_store,  # The same document store as the one used for indexing
    top_k=3,  # Number of documents to return
)

search_pipeline.add_component("query_embedder", query_embedder)
search_pipeline.add_component("retriever", retriever)

search_pipeline.connect("query_embedder.embedding", "retriever.query_embedding")
运行测试查询
如果我们的目标只是检索相关文档,我们可以在这里停止。让我们在简单的查询上尝试当前管道
query = "How to install an application using the OpenShift web console?"

search_pipeline.run(data={
    "query_embedder": {
        "text": query
    }
})
我们将 top_k 参数设置为 3,因此检索器应该返回三个最相关的文档。您的输出应如下所示
{
    'retriever': {
        'documents': [
            Document(id=867b4aa4c37a91e72dc7ff452c47972c1a46a279a7531cd6af14169bcef1441b, content: 'Install a Node.js application from GitHub using the web console The following describes the steps r...', meta: {'content_type': 'text/html', 'source_id': 'f56e8f827dda86abe67c0ba3b4b11331d896e2d4f7b2b43c74d3ce973d07be0c', 'url': 'https://developers.redhat.com/learning/learn:openshift:foundations-openshift/resource/resources:work-databases-openshift-web-console'}, score: 0.9209432),
            Document(id=0c74381c178597dd91335ebfde790d13bf5989b682d73bf5573c7734e6765af7, content: 'How to remove an application from OpenShift using the web console. In addition to providing the cap...', meta: {'content_type': 'text/html', 'source_id': '2a0759f3ce4a37d9f5c2af9c0ffcc80879077c102fb8e41e576e04833c9d24ce', 'url': 'https://developers.redhat.com/learning/learn:openshift:foundations-openshift/resource/resources:install-application-linux-container-image-repository-using-openshift-web-console'}, score: 0.9132109500000001),
            Document(id=3e5f8923a34ab05611ef20783211e5543e880c709fd6534d9c1f63576edc4061, content: 'Path resource: Install an application from source code in a GitHub repository using the OpenShift w...', meta: {'content_type': 'text/html', 'source_id': 'a4c4cd62d07c0d9d240e3289d2a1cc0a3d1127ae70704529967f715601559089', 'url': 'https://developers.redhat.com/learning/learn:openshift:foundations-openshift/resource/resources:install-application-source-code-github-repository-using-openshift-web-console'}, score: 0.912748935)
        ]
    }
}
生成答案
检索应该提供不仅仅是文档。因此,我们需要使用 LLM 来生成我们问题的确切答案。这是我们第二个管道的最后一个组件。
Haystack 将创建一个提示,将您的文档添加到模型的上下文中。
from haystack.components.builders.prompt_builder import PromptBuilder
from haystack.components.generators import HuggingFaceTGIGenerator

prompt_builder = PromptBuilder("""
Given the following information, answer the question.

Context:
{% for document in documents %}
    {{ document.content }}
{% endfor %}

Question: {{ query }}
""")
llm = HuggingFaceTGIGenerator(
    model="mistralai/Mistral-7B-Instruct-v0.1",
    url=os.environ["INFERENCE_ENDPOINT_URL"],
    generation_kwargs={
        "max_new_tokens": 1000,  # Allow longer responses
    },
)

search_pipeline.add_component("prompt_builder", prompt_builder)
search_pipeline.add_component("llm", llm)

search_pipeline.connect("retriever.documents", "prompt_builder.documents")
search_pipeline.connect("prompt_builder.prompt", "llm.prompt")
PromptBuilder 是一个 Jinja2 模板,将填充文档和查询。HuggingFaceTGIGenerator 连接到 LLM 服务并生成答案。让我们再次运行管道
query = "How to install an application using the OpenShift web console?"

response = search_pipeline.run(data={
    "query_embedder": {
        "text": query
    },
    "prompt_builder": {
        "query": query
    },
})
如果要求,LLM 可能会提供多个回复,因此让我们迭代并打印出来。
for reply in response["llm"]["replies"]:
    print(reply.strip())
在我们的例子中,只有一个回复,这应该就是问题的答案。
Answer: To install an application using the OpenShift web console, follow these steps:

1. Select +Add on the left side of the web console.
2. Identify the container image to install.
3. Using your web browser, navigate to the Developer Sandbox for Red Hat OpenShift and select Start your Sandbox for free.
4. Install an application from source code stored in a GitHub repository using the OpenShift web console.
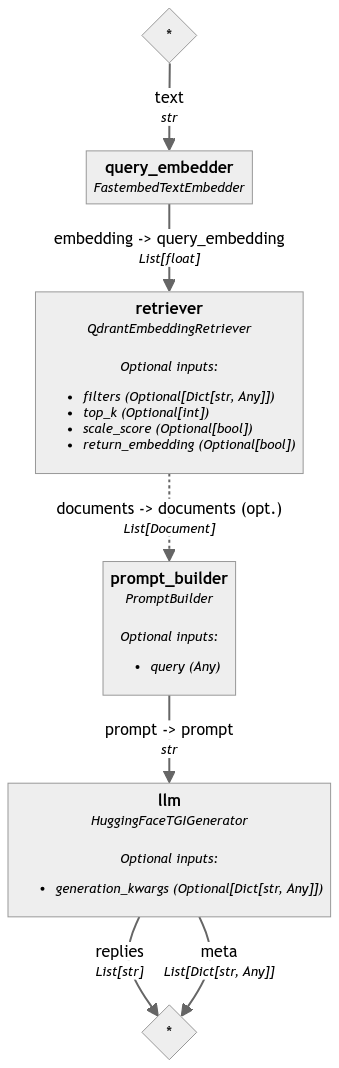
我们最终的搜索管道也可以可视化,这样我们就可以看到组件是如何连接在一起的。
search_pipeline.draw("search_pipeline.png")
部署
管道现在已准备就绪,我们可以将它们导出到 YAML。Hayhooks 将使用这些文件将管道作为 HTTP 端点运行。为此,请指定文件路径和您的环境变量。
注意:索引管道可以在您的 ETL 工具中运行,但搜索绝对应该作为 HTTP 端点公开。
让我们在本地机器上运行它
pip install hayhooks
首先,我们需要将管道保存到 YAML 文件中
with open("search-pipeline.yaml", "w") as fp:
    search_pipeline.dump(fp)
现在我们可以运行 Hayhooks 服务了
hayhooks run
该命令应在默认端口上启动服务,因此您可以在 https://:1416 访问它。管道尚未部署,但我们可以通过另一个命令来完成
hayhooks deploy search-pipeline.yaml
完成后,您应该能够在 https://:1416/docs 看到 OpenAPI 文档,并测试新创建的端点。
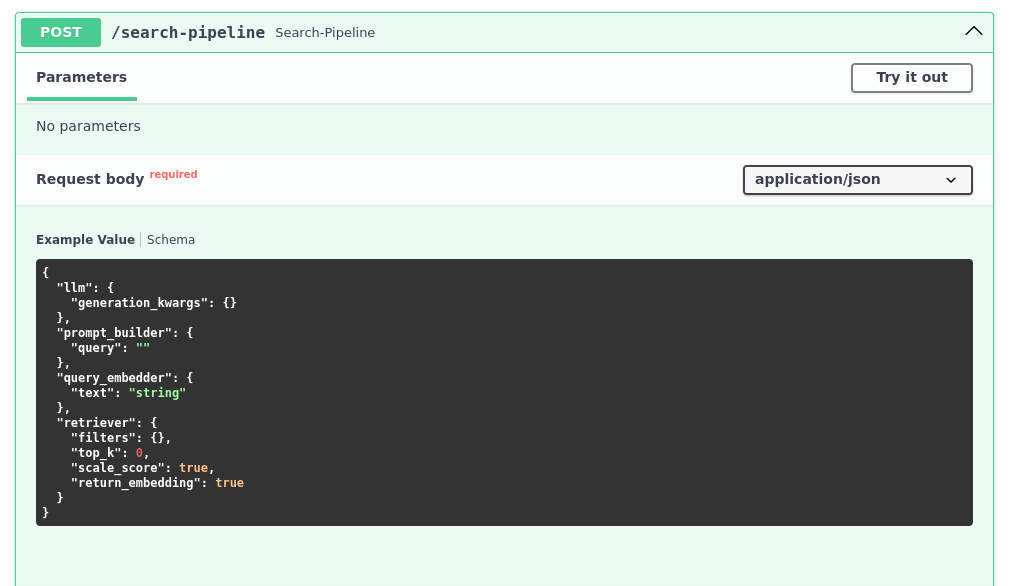
我们的搜索现在可以通过 HTTP 端点访问,因此我们可以将其与任何其他服务集成。我们甚至可以控制其他参数,例如要返回的文档数量
curl -X 'POST' \
  'https://:1416/search-pipeline' \
  -H 'Accept: application/json' \
  -H 'Content-Type: application/json' \
  -d '{
  "llm": {
  },
  "prompt_builder": {
    "query": "How can I remove an application?"
  },
  "query_embedder": {
    "text": "How can I remove an application?"
  },
  "retriever": {
    "top_k": 5
  }
}'
响应应该与我们之前在 Python 中获得的响应相似。
{
  "llm": {
    "replies": [
      "\n\nAnswer: You can remove an application running in OpenShift by right-clicking on the circular graphic representing the application in Topology view and selecting the Delete Application text from the dialog that appears when you click the graphic’s outer ring. Alternatively, you can use the oc CLI tool to delete an installed application using the oc delete all command."
    ],
    "meta": [
      {
        "model": "mistralai/Mistral-7B-Instruct-v0.1",
        "index": 0,
        "finish_reason": "eos_token",
        "usage": {
          "completion_tokens": 75,
          "prompt_tokens": 642,
          "total_tokens": 717
        }
      }
    ]
  }
}
下一步
在此示例中,Red Hat OpenShift 是专有聊天机器人的首选基础设施。阅读更多关于如何在他们的详尽文档中托管 AI 项目。
Haystack 的文档描述了如何在 Kubernetes 环境中部署 Hayhooks 服务,因此您可以轻松地将其移动到您自己的 OpenShift 基础设施。